I first got all those photos and videos that I would be using and imported into the project. After that I added my audio track right away, and added in markers according to the beat. After selecting my images and videos, I then selected the option 'automate to sequence' and clicked 'ignore audio' to delete the audio clip from the videos, that will be imported. Since it probably wouldn't be perfect on the first try, I moved around clips that I feel would be better in a different position. After all that, I added transitions on each one, (I could copy the transitions) I prefer adding different transitions on each one to make it match the beat better. When I was done, with all the text too, I exported it. But with the file possibly being larger than 100mb, I had to choose a different preset option. And I could choose either 'Youtube 480p SD' or if that's still too large, I could go for 'Twitter 640x640'
First things first, I gathered 21 images in total. I used the first 10 unsolved images and added graphics (Rectangle and text) as my intro. I changed the duration of the first 10 intro photos to 00;;00;;10 seconds and zoomed in and out using keyframes and copying attributes (to do it quicker) After I was done with the intro, that was when I added all 20 photos, in order, (unsolved then solved) and added keyframes to zoom in and out (scale), but I also added keyframes for gaussian blur. Then used copy attributes and pasted it to the designated pictures. Finally, I downloaded a classical music mp3 online and imported into the project, and trimmed part of the song.
I first gathered 10 images, but in my case 9 images and a gif, then I imported them into the project. I changed the duration of the photos before dragging them onto the timeline. When I wanted to add effects to a certain image I would click on the image then go to the toolbar above and go to editing/effects. I also used key frames to make the images change positions, or scale. And then I added music last.
Second Slideshow
For this slideshow I just followed the first tutorial above, with the exception of adding more images. This time for the music though, since I had to transition between it, I went to audio transitions options in the effects bar. I picked the fade option and dragged the transition and dragged it in between my two audio clips. And I used keyframes to animate the text and images. I also used the option 'Video Transitions' in the effects bar, and dragged the transition in between the clips that I want to transition it to. This also worked the same on text (graphics) Other than those small differences, everything else from this video was based off of the first tutorial.
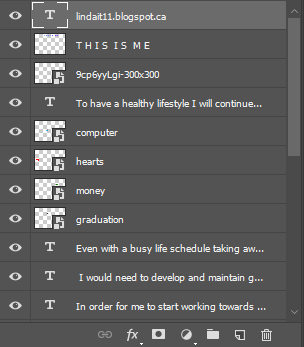
An alien inside a mirror portal looking at out at the fire.
First, I added the background first and left it there. Then I added the picture of the alien and cropped him out from his background using the quick selection tool [W] After I have the alien selection highlighted, I right click and click on the option layer via copy, which made a new layer of my cutout. Since the cut wasn't 100% accurate, I used the brush tool [B] to clean it up a bit. After that, I added the mirror in, and used the transform tool [CTRL + T] to place it into the fire. I then dragged every layer under the background layer because I changed the background to 'Screen' settings, which made everything blend together. Since the alien in the original image only had half of his body showing, it didn't fully fit the mirror so I selected the bottom part of mirror, which had half of his body missing, I used the 'Polygonal Lasso Tool' to select it, then I went into the toolbar at the very top and went to Edit > Fill > Content-Aware > Ok. The last part I just added my blog address above the background layer so it doesn't blend into the background like the other layers.
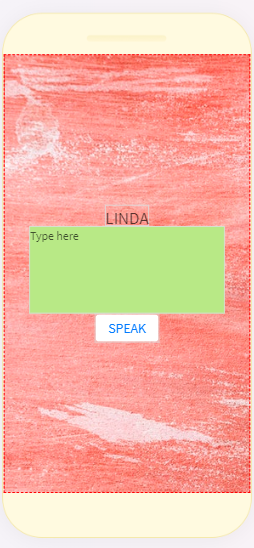
- Thunkable is an app-building program that allows you to develop apps without needing the knowledge of programming. I have done the tutorials from the beginning and started doing the intermediate apps, I left off at finishing the third intermediate app. So far I completed button changes, photo sharing, and screen navigation. In my opinion thunkable is okay, personally I would prefer doing actual coding so I can learn and use it in the future. But I like this because it's pretty simple and self explanatory from the blocks/pictures. And I feel like using thunkable is somewhat limited compared to ACTUAL programming.
- CTRL T = TRANSFORM TOOL FOR CROPPING AND ROTATING
2. Octopus
1. In order to remove the background from the octopus, I first selected the octopus with the tool with the quick selection tool [W].
2. Then I right click the outlined image with my mouse, and clicked on the option 'Layer Via Cut' That option will make a new layer of what you outlined. After that I just deleted the original photo, and was left with the layer of my outlined copy.
3. I used the Eraser Tool [E] to zoom in on the pixels and erase the unnecessary parts, like the tree/branches, to make it look cleaner.
4. After that I had to do 'Layer Via Cut' again but this time for, the octopus legs because they were apart from each other, so I used that to transform [CTRL T] each leg onto the octopus.
5. Final step to make it look a bit more cleaner, I used the eyedrop tool [I] to copy the color on the octopus, then I used the brush tool [B] to paste that color where I needed.


